Disclosures Due
This report was designed to give insight into the initial and closing disclosures that are coming due for your company. My hope is that this report can act as a starting point for reporting on your companies disclosure workflow.
Dataset
Before opening the template, please ensure that you have prepared either an Excel worksheet, a Microsoft SQL (MSSQL) Custom View, or a PostgreSQL Custom View to serve as the dataset, depending on the template you intend to use. Verify that the fields are named precisely as listed in the 'Field Name' column below. If Excel is your dataset, confirm that the sheet containing the relevant data is named Data.
Field Information
All these fields must be part of the dataset, if one of the fields listed is not something that is currently in your LOS then it is alright to use the same data point for the column. Example, if you don't have a field for your Branch name, then it would be ok to use a field like Branch Cost Center as the Branch data.
| Field Name | Field Description |
|---|---|
| Application Date | The date that a loan is considered an application |
| Branch | Field used for the name of the Branch |
| GUID | Unique identifier on a per loan bases |
| Loan Number | The loans loan number |
| Loan Officer | Loan Officer's name |
| Loan Type | The type of loan such as Conventional, FHA, etc... |
| Total Loan Amount | The full loan amount |
| Borrower First Name | The first name of the Borrower |
| Borrower Last Name | The last name of the Borrower |
| LE Due Date | Date that the LE must be sent by |
| LE Sent Date | Date that the LE was sent to the borrower |
| Est Closing Date | Estimated Date the loan will close |
| CD Sent Date | Date that the CD was sent to the borrower |
| CD Last Send Date | Date that the CD must be sent by |
These are the only required fields for the template to work correctly. If you want to expand your report to include other data points then you can add those fields in as long as they are not named the same as one of the columns above.
Note
This dataset uses many of the same filed as the other templates. It is possible to point the other templates at the same dataset to minimize the number of reports that need to be exported out of the LOS.
Using the template
Using Excel as a data source
Once you have your Excel file ready to go with the correct column headers and sheet name open the template_disclosures.pbit and you will be prompted for the file path to your Excel file. This file path must be the exact full path to the file. Example is if I have my Excel file saved to my desktop as LOS_Data.xlsx then the path I would type in is C:\Users\Jody\Desktop\LOS_Data.xlsx

Once the file path is typed in click load, your data will be imported and the report will open. From here you can customize the report by swapping out fields in visuals or possible changing measures or custom fields to better suit your companies work flow.
Using Microsoft SQL as a data source
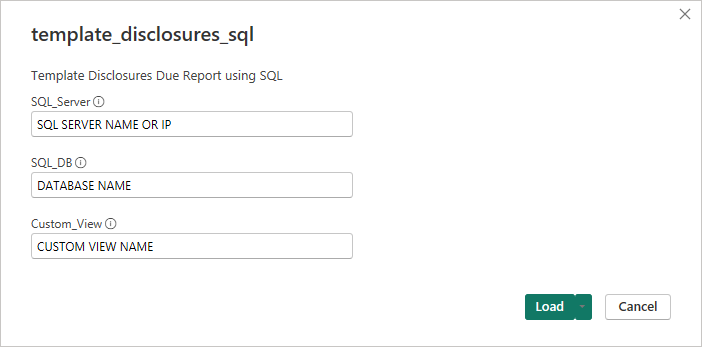
Once you have your MSSQL custom view built out with the correct column names, open the template_disclosure_sql.pbit and you will be prompted for 3 pieces of information:
- SQL_Server: This can be the IP address or name of the SQL server that the database that house your data resides.
- SQL_DB: This is the name of the database that holds the custom view we are wanting to use for the template.
- Custom_View: This is the name of the custom view that contains the columns needed for the template.

Note
If you need to add a port number to the end of your SQL server address simply add a colon to the end followed by the port number, example MY-SQL-SERVER:1234.
Once this information is loaded, you may be prompted for a username and password for the SQL server, please work with your server admin to get the correct credentials. Once everything is connected up the report will open allowing you to customize the report to your companies needs.
Using a PostgreSQL dataset
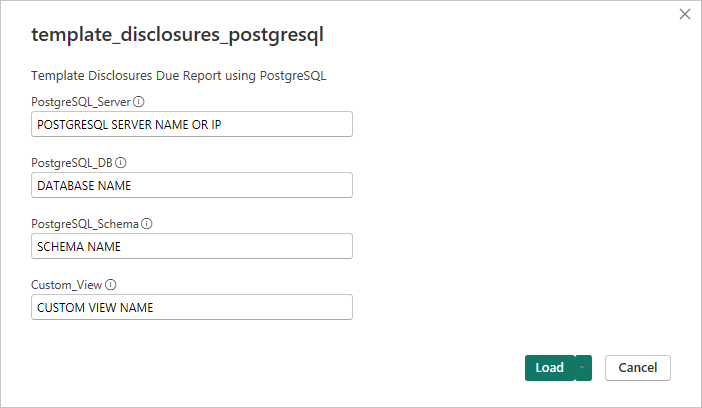
Once you have your PostgreSQL custom view built out with the correct column names, open the template_disclosures_postgresql.pbit and you will be prompted for 4 pieces of information:
- PostgreSQL_Server: This will be the IP address or name of the PostgreSQL server that houses the database with your LOS data.
- PostgreSQL_DB: This is the name the database that holds the schema and data we will be using for the template.
- PostgesSQL_Schema: This is the name of the Schema that holds the custom views and data that will be used for the tempalte.
- Custom_View: This is the name of the custom view that contains the data needed for the template.

Note
If you need to add a port number to the end of your PostgreSQL server address, simply add a colon to the end of your server IP or name followed by the port number, example would be: MY-POSTGRESQL-SERVER:1234, where :1234 is the port number.
Once this information is loaded, you may be prompted for a user name and password for the PostgreSQL server, please work with your server administrator to get the correct credentials. Once everything is connected up the report will open allowing you to customize the report to your companies needs.
Report Page
This is a single page report that delivers information about how many disclosures that have a due date of today, tomorrow, and then two or more days out. The report page is split in two with the left side acting as a slicer panel letting you choose a branch to focus on, which disclosure type you would like to see. You may only select one disclosure type at time otherwise the report will default to Closing. There is also a slicer for due in, allowing you to focus on a set of disclosures and filtering out those that may not be as high priority.
The right side of the report displays the data based on what slicers are set. The cards at the top provide a color coded total amount of disclosures due in their respective time frames. The bar graph breaks down total number of disclosures due based on how long they are due in by branch. You can drill into each branch to a loan officer level by using the drill down arrow found in the header of the visual or drill down to all loan officers by using the go to next level arrows (double set of down arrows next to the drill down arrow). The table visual provides loan level information along with a color status to the left of the loan number to indicate its current due in status.
Customization
Changing Colors
If you would like to change the colors that represent the number of days due in, you do so by doing the following for each visual:
- Cards: Under the Format Visual window choose Cards and then "Apply setting to" and choose the card you would like to edit. Once selected choose the Fill option and change the color using the color picker. You will need to change the "Apply setting to" select for each card.
- Bar Graph: Under the Format Visual window choose the Bars option and set the color based on what you would like.
- Table: To change the status color that appears edit the Dynamic Due Measures Color Switch measure found under Measures Table -> Formatting -> Dynamic. You will need the hex code for the color you would like to use.
Tip
If you have previously selected a color using the color picker then you can hover over that color in the color picker window to get the colors hex code. For constancy it would be best to set all visuals to have the same color code.
Download
- Download Template - Excel Data Source
- Download Template - SQL Data Source
- Download Template - PostgreSQL Data Source